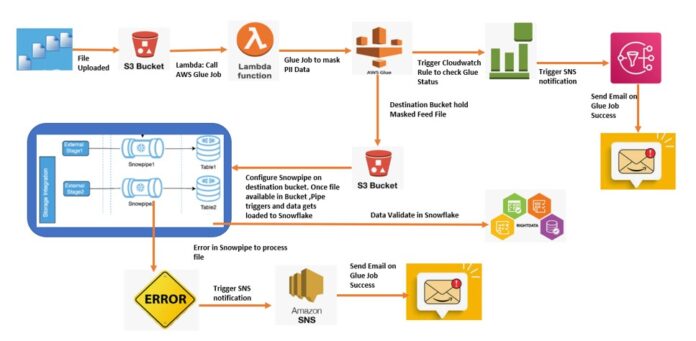
AWS Glue is a fully managed extract, transform, and load (ETL) service that makes it easy to move data between data stores. It is serverless, meaning that you don’t have to worry about provisioning and managing servers, and you only pay for the time taken by your ETL jobs. It also has a visual interface that allows you to define your ETL jobs without writing a single line of code. This makes it easy for users to perform data integration tasks, such as pulling data from various sources, transforming it to fit specific needs, and loading it into a data warehouse or data lake. Additionally, AWS Glue supports a variety of data formats and data stores, including relational databases, NoSQL databases, and data stored in S3.
Introduction to Snowflake
Snowflake is a Data Warehousing solution provided as a SaaS (Software-as-a-Service) offering. It is a cloud-based data warehouse that allows organizations to store and analyze large amounts of data in the cloud. It uses AWS, Azure, or Google Cloud in the background. It separates computing and storage, allowing customers to scale and pay only for what they use. Snowflake is known for its ability to handle structured, semi-structured, and unstructured data and its support for standard SQL. It also utilizes a unique architecture that allows for multi-cluster, multi-cloud data warehousing. Snowflake allows customers to store and analyze data with high performance and low cost, making it a popular choice for organizations looking to move to the cloud.
Table of Contents
- Prerequisites
- Setting up a Snowflake account and IAM role
- Creating an S3 bucket and uploading connector and JDBC files
- Configuring the AWS Glue job
- Running the Glue job and querying the data in S3
- Best practices for secure credential storage
- Monitoring and optimization for cost and performance
Prerequisites
The prerequisites for setting up AWS Glue with Snowflake include the following:
- A Snowflake account: You will need a Snowflake account to connect to a Snowflake database and perform data integration tasks. You can sign up for a 30-day free trial, which will be sufficient for this tutorial.
- An AWS account: AWS Glue ETL jobs are not covered under the free tier, so you will incur a nominal charge while following this tutorial. To minimize costs, you can use the lowest-cost options and follow best practices for cost optimization.
- Familiarity with AWS IAM roles and S3: A basic understanding of AWS IAM roles and S3 will help set up the necessary permissions and storage for your Glue job.
Setting up a Snowflake account and IAM role.
● To set up a Snowflake account, you can sign up for a 30-day free trial on the Snowflake website.
● Once you have a Snowflake account, you will need to create an IAM role in AWS that has permission to access your Snowflake account. This role will be used by your Glue job to connect to Snowflake.
● In Snowflake, create a role with the necessary permissions to access the data you want to integrate with Glue.
In order to evaluate your skills in the Data Warehousing Certification Courses platform, Snowflake Training helps a lot.
Creating an S3 bucket and uploading connector and JDBC files
● In the AWS Management Console, navigate to the S3 service and create a new S3 bucket.
● Upload the Snowflake Spark Connector and JDBC Driver to the S3 bucket. Make sure to use the latest versions of these files.
● Create a folder in the S3 bucket to be used as the Glue temporary directory.
Configuring the AWS Glue job
● In the AWS Management Console, navigate to the Glue service and create a new job.
● Provide a name for the job and select an IAM role. Create a new IAM role if one doesn’t already exist, and be sure to add all Glue policies to this role.
● Select type Spark, the Glue version, and Python 3 as the language.
● Under Advanced properties, give the script a name and set the temporary directory to the one you created in step 2. Add entries for both .jar files from step 2.
● Under Job parameters, enter the Snowflake account information and credentials.
Running the Glue job and querying the data in S3.
● Once you have configured the Glue job, you can run it, and it will read data from the Snowflake database, perform any necessary transformations, and write the data to the S3 bucket.
● You can use the AWS Glue Data Catalog or other tools like Amazon Athena or Redshift Spectrum to query the data in the S3 bucket.
Best practices for secure credential storage
● Instead of hard-coding the credentials in the Glue script, you can store them in an AWS Systems Manager (SSM) Parameter Store and retrieve them in the script using the AWS SDK.
● AWS Secrets Manager can store and manage your Snowflake account credentials. Secrets Manager enables you to secure, rotate and manage access to your credentials.
● You can also use AWS Key Management Service (KMS) to encrypt the credentials stored in the S3 bucket.
Monitoring and optimization for cost and performance
● Use CloudWatch Metrics to monitor the performance of your Glue job, such as the number of records processed and the time taken by the job.
● Use CloudWatch Logs to monitor the log files generated by your Glue job and troubleshoot any issues.
● Use the Glue Job metrics and CloudWatch Alarms to set up notifications for any issues or failures.
● Optimize the number of Glue data processing units (DPUs) used by your job to minimize costs.
● Regularly review and delete any unnecessary data stored in S3 that is no longer needed for analysis to avoid unnecessary costs.
● Schedule your Glue job to run during non-peak hours to reduce costs.
● Monitor the Snowflake usage and optimize its performance by using the Snowflake performance monitoring features and query history.
● Use the Snowflake cost optimization features to manage data storage costs and compute resources.
Conclusion
In conclusion, AWS Glue and Snowflake provide a powerful and flexible solution for managing programmatic data integration processes. You can quickly move data between data stores using AWS Glue, and by using Snowflake, you can perform robust data warehousing and analysis tasks.
Setting up AWS Glue and Snowflake for data integration involves a few steps, including setting up a Snowflake account and IAM role, creating an S3 bucket and uploading connector and JDBC files, configuring the AWS Glue job certificiation, and running the Glue job and querying the data in S3.
It is essential to follow best practices for secure credential storage, monitoring, and optimization for cost and performance. These steps will help you to keep costs low and performance high and ensure that your data integration process runs smoothly.
As the following steps, consider automating your Glue job by using AWS Glue Crawlers and Trigger, and you can schedule your Glue job to run regularly, depending on your data integration requirements. Additionally, you can explore other features of Snowflake, like Time Travel, Data sharing, and Data cloning which can help you in different use cases.
Author Bio
Meravath Raju is a Digital Marketer, and a passionate writer, who is working with Tekslate, a top global online training provider. He also holds in-depth knowledge of IT and demanding technologies such as Business Intelligence, Salesforce, Cybersecurity, Software Testing, QA, Data analytics, Project Management and ERP tools, etc.


